顯示具有 vue3 標籤的文章。 顯示所有文章

2024年1月16日 星期二

如何再遮罩上挖個洞

前言

相信大家都有用過Modal,都有遇過背後那半透明的遮照,但如果要做到以下效果,在下方按鈕上挖一個洞,我的第一直覺應該會用圖片去做處理


實際上這是我接手同事專案後他做出來的效果,我仔細研究了一下他的程式碼,發現想法還挺有趣的直得學習一下。
因為這部分程式碼不好呈現,所以今天就用截圖代替吧,絕對不是因為我比較懶
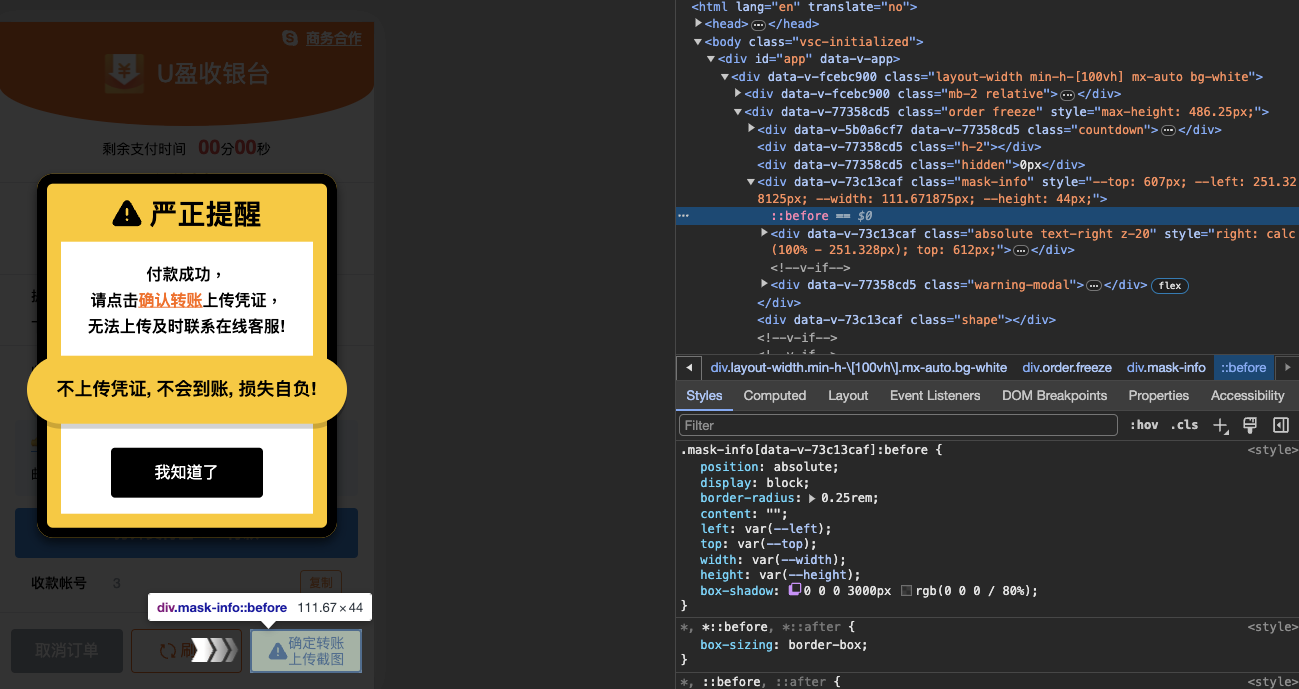

簡單解釋,mask-info一樣左上對齊,設成fixed。
這裡使用
const { x, y, height, width } = element.getBoundingClientRect()
去取得按鈕(目標元素)的座標及大小,放到類元素:before去瞄準絕對位置跟尺寸,最後使用box-shadow讓陰影往外延伸並且設上透明度(照片中往外延伸3000px,以手機版來說也很夠用了)。
打完收工。

後記
跟以往我總是從座標0,0開始思考有點不一樣,沒想到類元素還可以這樣使用。只能說世界還是很大啊~(煙

<div class="mask-info" :style="clipPath">
...
</div>
const clipPath = computed(() => {
const { x, y, height, width } = props.data // element.getBoundingClientRect() 進來的值
return {
"--top": `${y}px`,
"--left": `${x}px`,
"--width": `${width}px`,
"--height": `${height}px`,
}
})
.mask-info {
@apply fixed left-0 right-0 top-0 bottom-0 z-[100];

&:before {
@apply absolute block rounded;
content: "";
left: var(--left);
top: var(--top);
width: var(--width);
height: var(--height);
box-shadow: 0 0 0 3000px rgba(0, 0, 0, 0.8);
}
}

另外紀錄一個點,同事使用var(--left)去取得主元素的style left值,這點也挺特別的,沒有使用vue3原生的v-bind去取
如果沒意外應該會寫成這樣
left: v-bind("clipPath['--left']")


2022年4月28日 星期四

檢查點擊element是否在某個範圍

 時常有dropdown(or modal)需求,在點擊空白要消失,但在dropdown範圍點擊(或移動)則保持顯示,這時不用用一堆if else去判斷滑鼠位置,只要用簡單的contains就可以判斷(以下用vue3示範)

// <template lang="pug">
div(
ref="dropdownlist",
:class="!showDropdown ? 'invisible' : ''"
)
    span test

// <script lang="ts">
// 顯示開關
const showDropdown = ref(false)
// 指定範圍物件
const dropdownlist = ref<Node>()

onMounted(() => {
  window.addEventListener(
"click",
(e: MouseEvent) => {
     // 判斷點擊物件是否在指定物件內
if (showDropdown.value && !dropdownlist.value?.contains(e.target as Node)) {
showDropdown.value = ! showDropdown.value
}
},
true // 冒泡捕捉
)
})

小結:這樣就可以輕鬆達到目的,這是我目前看到最簡單的辦法,剩下就看你怎麼應用啦


2021年9月23日 星期四

vite vue3 ts踩過的坑

記錄一下踩過的坑

在src/interface/index.ts寫了如下

export interface iSelf {
id: number
phone: string
role: number
email?: string
name_ch?: string
name_en?: string
gender: number
identity_id?: string
birthday?: string
resident_status: string
}

export interface iUser extends iSelf {
checked: boolean
}


再引用時卻出現

Uncaught SyntaxError: The requested module 'src/interface/index.ts' does not provide an export named 'iUser'

這沒道理啊,一個檔案寫一個interface就正常,寫兩個就抱錯了!

網上高手給出ts3.8的export type特性

https://www.typescriptlang.org/docs/handbook/release-notes/typescript-3-8.html?fbclid=IwAR1pDqvqiYjNJkzFarak8i29xKAnPCCtK5fy2xgjUUmcS0BW4eRnqaesISo

但使用過後依然沒效

最終找到 https://github.com/vitejs/vite/issues/2117 這理尤大給出的答案,vite只支援ES Module,所以對於typescript的支援需要安裝套件

基本上安裝@rollup/plugin-typescript + tslib,然後到vite.config.ts加上plugin

import typescript from "@rollup/plugin-typescript"

export default defineConfig({
plugins: [vue(), typescript()],
})

然後src/interface/index.ts修改如下

/// <reference path="_user.d.ts" />

src/interface/_user.d.ts內容如下(對於src/interface模組進行擴充)

declare module "src/interface" {
interface iSelf {
id: number
phone: string
role: number
email?: string
}

interface iUser extends iSelf {
checked: boolean
}
}

使用方式如下(注意是import type)

import type { iUser } from "src/interface"
const datas: Array<iUser> = []

這樣運行就正常了

----------------------- 我是分隔線 ------------------------

以下不是常規方法,但總算是我試出來的分法,也記錄一下

如果不想引用套件,那src/interface/index.ts就要額外宣告變數

/// <reference path="_user.d.ts" />

export const iUser = {}
export const iSelf = {}

使用

import { iUser } from "src/interface"

但這樣有時還是會錯誤,iUser有時會被認為是any,所以還是乖乖正規吧

小結

看來一門技術只出來一年,還是有許多坑要採,沒關係要用就用得徹底一點,繼續踩坑吧

----------------------- 我是分隔線 ------------------------

9/5補充

不知為何當天需要安裝@rollup/plugin-typescript, tslib套件,vite原生就可以支援typescript才對,今天測試把套件拿掉結果一樣可以跑,所以就這樣吧~